")
")
| CD2RXU's LoRa APRS Tracker software is a fork of OE5BPA's, to which he has added functionalities. It brings several improvements over the original software, including : - a menu offering a choice of functions - choice of different callsigns (and icons, e.g. TK5EP-9 car, TK5EP-7 runner, etc.) - the ability to view the reception of other Trackers - reduced power consumption by lowering CPU speed - compression of transmitted data to reduce transmission time, thus reducing power consumption and improving reception immunity - local weather report request, etc... To take advantage of certain functionalities, you also need to use his iGate software. |
Acronymes :
APRS : Automatic Packet Reporting System. Aka Automatic Positioning Reporting System
APRS-IS : Automatic Packet Reporting System-Internet Service, APRS datas are send via Internet
LoRa : Long Range. Spread spectrum modulation aka Chirp spread spectrum
MQTT : Message Queuing Telemetry Transport. Publish-subscribe protocol over TCP/IP
OLED : Organic Light-Emitting Diode. Screen display type
VSC : Visual Studio Code, code editer & compiler
WAN : Wide Access Network.
Principle :
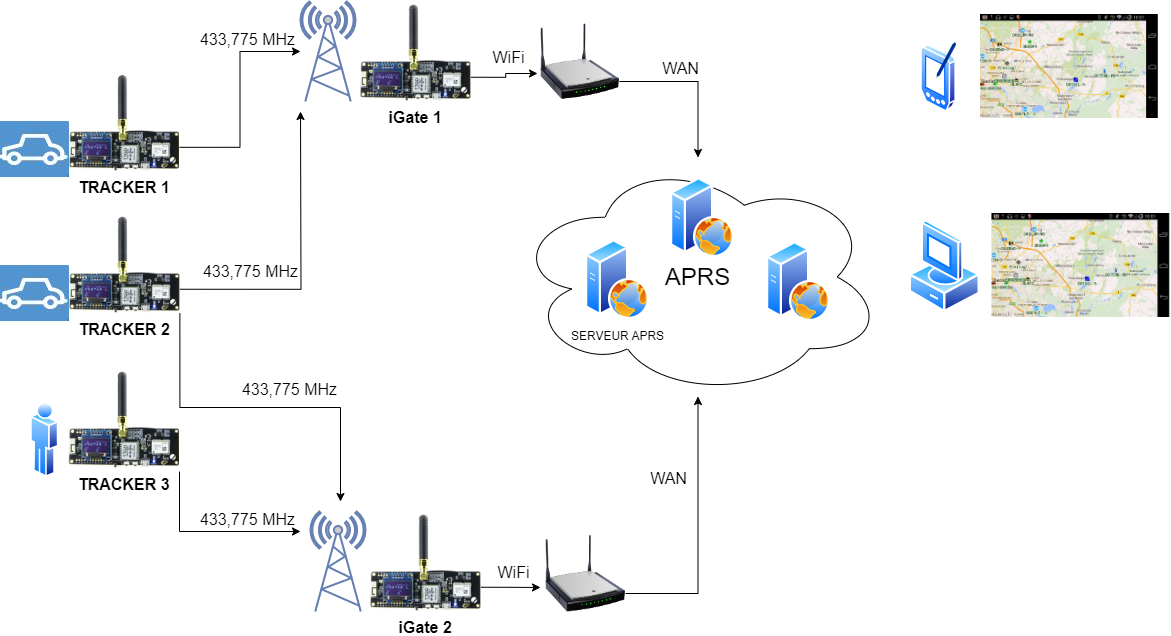
Trackers are used to transmit their geographical position in real time via LoRa modulation on the 433.775 MHz frequency.
They are built using ESP32 LoRa modules, which comprise a 433 MHz transmitter/receiver, a GPS receiver, a WiFi module, a microcontroller and an OLED display. They are generally installed in vehicles or in pedestrian mode.
iGate" systems receive the frames sent on 433.775 MHz by Trackers and inject them into the APRS network via Internet access.
They are built with ESP32 LoRa modules almost identical to the Tracker, but without the GPS receiver, which is not useful. They are installed in fixed positions on high points, or in urban areas, to ensure the widest possible coverage.
Tracker and iGate positions can then be viewed by the community on maps using a browser on a computer or PDA connected to the aprs.fi or aprs.radioamateur.tk websites, for example.
Matériels utilisés :
For the Tracker, the LILYGO TTGO T-beam v1.1 433 MHz band module.
It features an ESP32 processor, NEO-6M GPS, 0.96" OLED display, Lora transceiver, WiFi and Bluetooth.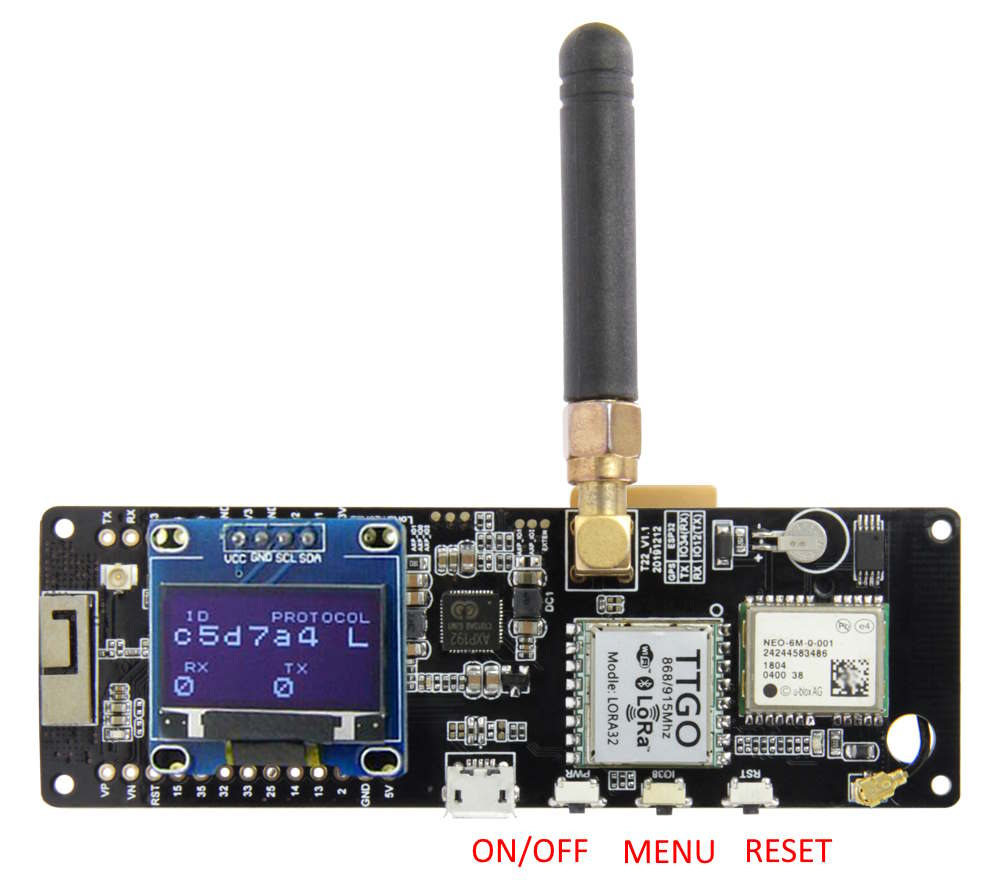
Preparing installation :
![]() Before installing anything, check that the module works with the software installed on delivery (display, GPS, etc.).
Before installing anything, check that the module works with the software installed on delivery (display, GPS, etc.).
This check removes any doubt in the event of a future problem, and avoids wasting time during subsequent operations.
![]() Connect the ESP32 module to the computer via a USB port.
Connect the ESP32 module to the computer via a USB port.
The Device Manager should recognize the COM port used. If it doesn't, you'll probably need to install the correct USB driver, depending on the modules and interface circuit used. I had to install the CH9102 driver.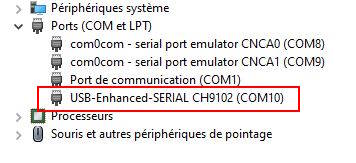
Tracker and iGate are designed to be installed using the Visual Studio Code (VSC) editor and PlatformIO extension.
You must therefore have these programs installed beforehand.
This article is not intended to explain how to install these programs. Tutorials are available elsewhere.
Installation :
The Tracker software is available here :
https://github.com/richonguzman/LoRa_APRS_Tracker
The iGate software is available here :
https://github.com/richonguzman/LoRa_APRS_iGate
Download the software :
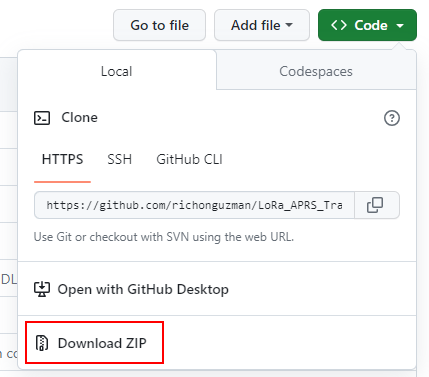
Next, unpack the ZIP archive and place it somewhere on your computer's hard disk.
With VSC, select "Files" + "Open folder" and choose the appropriate folder to load the software.
Configuration :
(version 10.08.2023)
The configuration file is the folder : /data/tracker_config.json
The part concerning callsigns is in the "Beacons" table.
Each object has a "callsign" key with several other keys that are the related parameters.
These parameters are used to adapt the beacon's transmission according to the type of beacon (car, pedestrian, bicycle).
The "symbol" key is adapted to the type of beacon ("[" = runner, ">" = car, "b" = bike ).
The smart beacon part adjusts the beacon transmit period to the speed of the tracker.
The faster the vehicle goes, the often the beacon transmits.
The first callsign object must be the default one that will be loaded at startup. (until the author adds an option to memorize the choice of callsign)
| beacons | callsign | NOCALL-10 | Callsign with SSID |
| symbol | > | Beacons symbol, see table | |
| overlay | / | Overlay for icons, in connection with "symbol". | |
| comment | Comment to be sent, keep it as short as necessary as it lenghtens the beacon | ||
| smart_beacon | active | true | Smart beacon, allows an intelligent beacon transmission in relation with tracker movement |
| slowrate | 120 | in s, slow rate period | |
| slowSpeed | 10 | in km/h slow speed limit | |
| fastRate | 60 | in s, fast rate period | |
| fastSpeed | 70 | in km/h fast speed limit | |
| minTXdist | 100 | ||
| minDeltaBeacon | 12 | ||
| turnMinDeg | 10 | in degrees, direction change limit | |
| turnSlope | 80 |
![]()
The following objects "lora" and "other" are related to LoRa transmission and general beacon parameters.
![]()
| Lora | frequency | 433775000 | Frequency in kHz |
| spreadingFactor | 12 | Spreading factor | |
| signalBandwidth | 125000 | LoRa bandwidth | |
| codingRate4 | 5 | Number of bits transmitted for error correction | |
| power | 20 |
Power in dBm. 20 dBm = 100 mW |
|
| other | showSymbolOnScreen | true | True=active. Show tracker symbol on OLED display. |
| sentCommentAfterXBeacons | 30 | Send the comment after 30 beacon transmissions | |
| displayEcoMode | false | Screensaver activation (saves battery) | |
| displayTimeout | 4 | Delay before screen shutdown (saver) | |
| path | WIDE1-1 | Number of hops a beacon can make | |
| noneSmartBeaconrate | 15 | Time for fixed time beacon when no SmartBeacon is active | |
| rememberStationTime | 30 | In min, time for remembering a station/tracker in the listening part | |
| maxDistanceToTracker | 30 | Not implemented | |
| standingUpdateTime | 15 | In min, interval of beacon transmit when no tracket movement | |
| sendAltitude | true | Send the altitude value | |
| sendBatteryInfo | false | Send battery voltage in beacon comment | |
| bluetooh | true | activiates bluetooth to work via KISS or TNC mode to connect an external software like APRSDroid | |
| disableGPS | false | disables the TTGO internal GPS in case of use of an external software | |
| ptt_trigger | activate | false | true = active to switch an external PA |
| io_pin | 4 | TTGO pin for PTT | |
| preDelay | 0 | delay in ms before PTT | |
| postDelay | 0 | delay in ms after PTT | |
| reverse | false | PTT inverted or not |
Once the parameters have been modified as required, compile the software.
- Select the environment according to the TTGO module model with [1].
- Select the COM port for transfer into TTGO [2]
- Start compilation and transfer with [3].

This process may take some time the first time, as missing libraries are downloaded.
If all goes well, the message [4] in the terminal window should display SUCCESS.
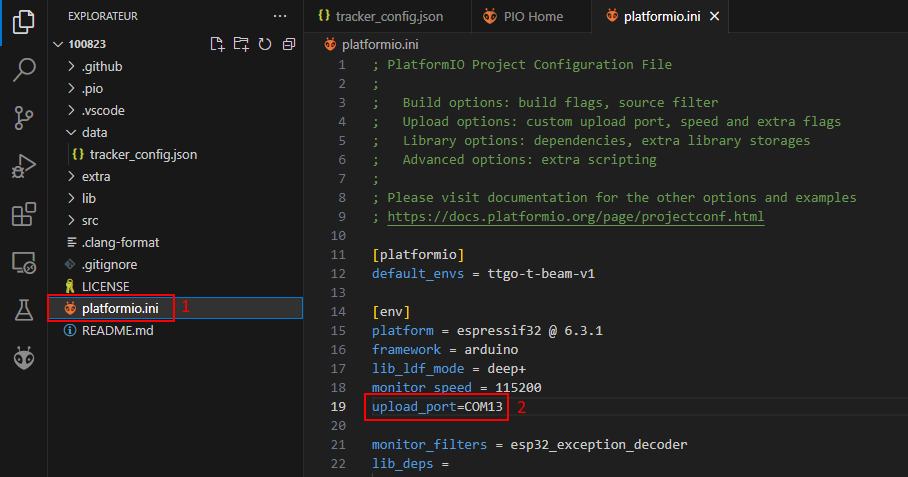
It may happen that the VSC editor does not correctly detect the serial port to which the module is connected.
In this case you have to add a parameter to the configuration file platformio.ini and restart the compilation.
All that remains is to transfer the filesystem image, which contains the parameters.
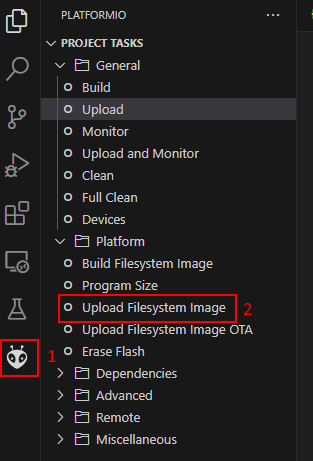
If this operation is not performed, the tracker screen remains frozen.
Possible problems :
- No communication with the module: Change the USB cable and check that the USB port is correctly detected (see above).
Install and transfer the software as with VSC. Then reinstall the Tracker software.
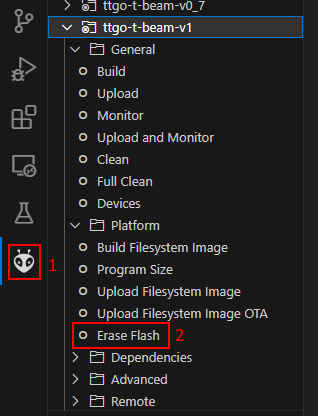
- Despite a successful transfer, the screen remains black when the module starts up: check the wiring of the OLed screen, reset the flash memory and reload the software and filesystem.
- On first use, the Tracker GPS may take a very long time to make a first GPS fix (up to 20 min). If no fix is possible, this may be due to a problem with the previously installed software, which is blocking dialogue with the GPS module. In this case, you'll need to reset the GPS according to LilyGo's instructions:
https://github.com/Xinyuan-LilyGO/LilyGo-LoRa-Series/tree/master/firmware/NMEA_Reset
It seems that the latest versions of the software detect this lack of dialogue and display an error message asking you to perform a reset.
Usage :
On start-up, the software waits for the GPS to perform a GPS fix.
If the red LED at the bottom right of the module flashes, at least 3 satellites have been received and the time has been detected. For the module to send the 1st beacon, at least 4 satellites must be received.
If this first GPS point does not occur, it may be due to an antenna problem, lack of clearance or a dialogue lock with the GPS module.
Start by moving to sky clear place and wait up to 20 minutes. After that if still no fix, you'll need to check the antenna and possibly perform a reset, as described in my article on the OE5BPA tracker.
Menu :
The central button is used to navigate between several menus:
Menu 0
- 1 short press: force APRS beacon transmission
- 1 long press: select callsign (as programmed in configuration file)
- 2 short presses: go to menu 1
Menu 1
- 1 short press: displays memory of messages received
- 1 long press: clears memory of received messages
- 2 short presses: go to menu 2
Menu 2
- 1 short press: send weather data request https://openweathermap.org/
- 1 long press: trackers received + distances and azimuths
- 2 short presses: go to menu 3
Menu 3
- 1 short press: nothing for the moment
- 1 long press : change the EcoMode
- 2 short presses : return to tracker mode
The frequency at which the beacon is sent depends on the speed at which the module is moving. Above a certain threshold, the frequency increases.
These parameters can be modified in the "smartbeacon" section of the configuration file.
Using the menu, you can select a different callsign and adapt the smartbeacon parameters. For example, for a car, a pedestrian with different SSIDs or a different callsign.
Main screen :
![]()
Line 1: Call sign and symbol used
Line 2: Date and time from GPS receiver
Line 3: Alternatively, geographic coordinates and QRA locator + number of satellites received
Line 4: Altitude, speed and heading.
Line 5: Last APRS station received
Line 6: Battery charge status
Blueetooth :
The tracker can be used in conjunction with APRSDroid software (Android only) via Bluetooth and the KISS protocol.
It then acts as a TNC, connecting APRSDroid to the APRS network and replacing the 3G connection.
It transmits the PDA's GPS position via the tracker's LoRa modem to the APRS-IS network.
In the other direction, the tracker sends the beacons received in LoRa to APRSDroid, which displays them on its map.
The software must have been compiled with the parameter "bluetooth : true".
If you don't want the tracker to send its own position while APRSDroid is in use, set the "disableGPS: true" parameter.
Next, pair the tracker with the PDA via Bluetooth.
Then, in the APRSDroid preferences, modify the following parameters:
- Connection preferences / Connection protocol": TNC(plain text TNC2)
- Connection preferences / Connection type": Bluetooth SPP
- "Connection preferences / TNC bluetooth module": choose the name of your tracker "LoRa Tracker xxxx" from the list of paired devices.
- Location settings / Location source": select the desired mode. Smartbeaconing is best suited to APRS. Manual to test without GPS reception.
Start localization on APRSDroid.
If the connection is established, the tracker should display the Bluetooth icon alternately with the APRS icon in the top right-hand corner of the tracker's OLED display.
Test transmission by clicking on "Send position" and check in the log if everything works.
For correct performances, it is advisable to use more efficient antennas than those supplied with the module, both for GPS reception and for 433 MHz reception. The performance of these antennas is poor because of their sizes.
My tests carried out with the same module for the radiosonde balloons tracking showed that the module radiates quite a lot and disturbed the reception and that it was necessary to move the antennas away from the module.
Links :
Visual Studio Code
Pilote pour chip CH9102
Carte des iGate LoRa
aprs.fi
aprs.radioamateur.tk
Symboles des icones APRS
GPS reset ou LiLyGo