")
")
 |
After having build a radiosonde receiver using the DL9RDZ software and a TTGO module, here is a short article on its use in the field. |
Reminders
The RDZ_TTGO receiver is autonomous because it displays all the necessary informations, namely:
- GPS data transmitted by the radiosonde (Lat, long, altitude, temperature, humidity)
- GPS data of the position of the TTGO receiver
- The distance and bearing from the receiver to the radiosonde
- The IP address assigned to the module, etc...
All this information is sufficient to find the radiosonde with only the receiver. But there is the possibility of making the search easier using a graphical interface and base maps.
The operating principle of the set is as follows:
- The TTGO module connects to an access point via WiFi
- We connect to the TTGO module via a web browser
- The module's web server displays the background maps with the positions of the sonde and the module
It then becomes easy to head towards the radiosonde by car and then on foot.
The radiosonde can be found within a few meters.
Configurations
In order to benefit from the maps, the TTGO module must connect via Wifi to the Internet where it will retrieve the Openstreetmap base maps.
It is therefore necessary to configure at least one access point. This is done via the web server integrated into the module or via a configuration file as explained in a previous article.
On startup, the module searches for all the access points within its range and a connection attempt is made on the 1st programmed on the list.
If no network is found or at the first use, the module switches itself to AP mode (access point) in order to allow a direct connection. The IP address assigned to the module is displayed on the display.
You can then connect directly to the module at this address with a browser and configure the desired access points via the Wifi tab.
An example is given below. First, I configured my S20 mobile access point.
BEWARE ! Do not change the first line (AP), this is the default name of the acces point of the ttgo module.
After this configuration, it is then possible to proceed with the rest of the configurations, in particular the frequencies to be received.
The frequencies to be scanned are configurable in the QRG tab.
The other configurations are described in the article Installation rdz_ttgo_sonde
A restart of the module will then allow its connection to the 1st available access point and therefore the possibility of distributing the data received on the Sondehub Tracker site and recovering the maps.
Field use
Once these configurations have been made, in particular the creation of the mobile access point, you can go into the field to get started.
The ttgo module has 3 buttons.
Button 3 is the reset. (reset)
Button 2
Single short press:
In spectrum mode: switch to scan mode.
In scan mode: switch to decoder mode (see below)
In decoder mode: switch to the next frequency (configured in the QRG tab)
Double press: Switch to scan mode (if in decoder mode)
Temporary press (approx. 3 seconds): Switch to spectrum mode
Long press (>5 seconds): Switch to WiFi scan mode
The main button 1
A long press serves as ON/OFF. To turn off, you need a very long press until it turns off.
Successive short presses change the different displays available:
# 0=scanner, 1=Legacy, 2=Field, 3=field2, 4=GPSDIST, 5=BatteryOLED, 6=Weather, 7=GPS-Data
Personally, I only display 1,4,5,6,7 (to be modified in OLED/TFT settings)
| Screen 0 : Scanner displays the scanner and the IP address of the TTGO module  |
| Screen 1 : Legacy displays main info about radiosonde, received signal and decoding status 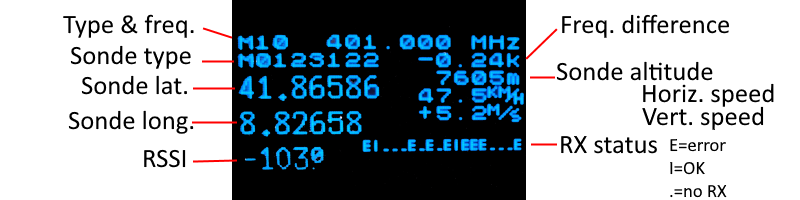 |
| Screen 4 : GPSDIST displays the position of the Sonde and information to steer towards it. 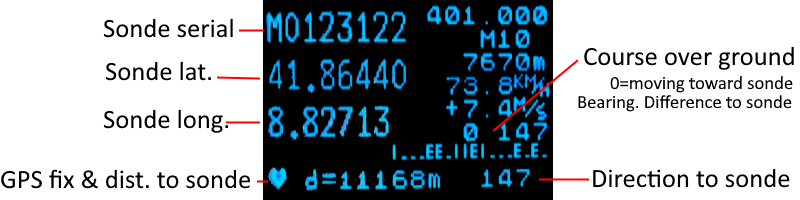 |
| Screen 5 : Battery displays battery and charger data  |
Screen 6 : Meteo
displays the weather data sent by the radiosonde. The altitude is not measured, but calculated.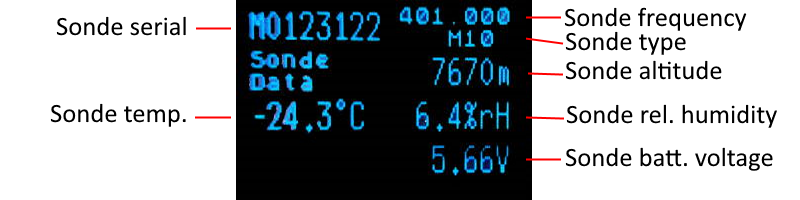
| Screen 7 : GPS Data displays data from the TTGO module's GPS receiver 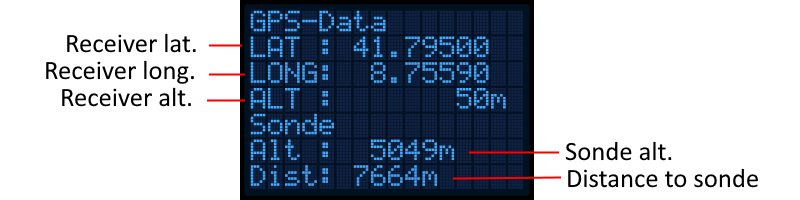 |
The Livemap tab allows a display of a background map with the positions of the receiver and that of the radiosonde.
Of course, the WiFi access point must have a stable connection to the Internet, which is not always the case when using a mobile phone and a 4G connection as an access point. We then lose the update of the maps.
The screen displays all the necessary information, including:
A map with the position of the receiver + the sonde, and the predictions of the burst and drop point positions is also displayed.
The Map tab displays the Sondehub Tracker site page and allows you to verify that the information from the TTGO module is sent to this site and to track the sonde using your own data and those received by other receivers.
In summary
1) Create a hotspot using mobile phone
2) Turn on the ttgo module
3) Connect using a browser to the address indicated on the module display
4) Show Livemap Page
5) Find the radiosonde!
Good hunt.


